
How to Choose the Right Wireless Microphone for Clear Vlogging Audio Guide
Here’s the ugly truth: people will forgive a slightly soft 1080p image. They will forgive a blown-out window in the background. But the second your audio sounds like you’re broadcasting from inside a soup can? They smash the back button. I’ve spent the last decade reviewing gear for independent video creators, and nothing breaks my heart quite like watching someone drop two grand on a cinema camera only to capture their voice using the built-in microphone that sounds like a lawnmower in a wind tunnel. Trust me on this—upgrading your audio is the single highest-ROI decision you can make for your channel. Let’s figure out how to stop sounding terrible and pick the right wireless microphone for your vlogs.
- • The Anatomy of Bad Audio (And Why Your Built-In Mic Is Sabotaging You)
- • UHF vs. 2.4GHz: Which Frequency Band Do You Actually Need?
- • Key Features to Evaluate Before Swiping Your Credit Card
- ↳ 1. Internal Safety Track Recording
- ↳ 2. Gain Staging and Limiting
- ↳ 3. Capsule Polar Pattern and Lav Compatibility
- • The Verdict: Matching the Mic to Your Vlogging Style
- ↳ Do I really need a deadcat windscreen if I only vlog indoors?
- ↳ Why does my wireless microphone sound robotic or phasey?
- ↳ Can I use wireless microphones with my smartphone?
- ↳ What is 32-bit float audio and do I need it?
Key Takeaways & Quick Overview
AI Verified
- ✔How to choose the right wireless microphone for clear vlogging audio guide here’s the ugly truth: people will forgive a slightly soft 1080p image.
- ✔They will forgive a blown-out window in the background.
- ✔But the second your audio sounds like you’re broadcasting from inside a soup can? they smash the back button.
- ✔I’ve spent the last decade reviewing gear for independent video creators, and nothing breaks my heart quite like watching someone drop two grand on a cinema camera only to capture their voice using the built-in microphone that sounds like a lawnmower in a wind tunnel.
The Anatomy of Bad Audio (And Why Your Built-In Mic Is Sabotaging You)
Before we talk specs, let’s talk physics. Camera microphones are designed to be general-purpose safety nets. They point forward, sure, but they also pick up the whir of your camera’s internal motor, the wind rustling through your jacket, and every single bounce of sound off your bare apartment walls. This creates what audio engineers call phase cancellation and boxy room reverb. When you step back even five feet from the lens, you enter the acoustic danger zone.
A dedicated wireless microphone bypasses all of that. By pinning a tiny transmitter directly to your chest—about six to eight inches below your chin—you drastically increase the “signal-to-noise” ratio. Your voice hits the capsule at a roaring volume, while the ambient room noise stays quiet in the background. But not all wireless systems are built the same. If you buy the wrong one, you’ll trade room echo for digital dropouts and robotic compression artifacts.
UHF vs. 2.4GHz: Which Frequency Band Do You Actually Need?
Let’s clear up the biggest marketing myth in the creator economy. Brands love to slap “Pro” on the box, but if you don’t understand radio frequencies, you’re rolling the dice every time you hit record in a crowded downtown street.
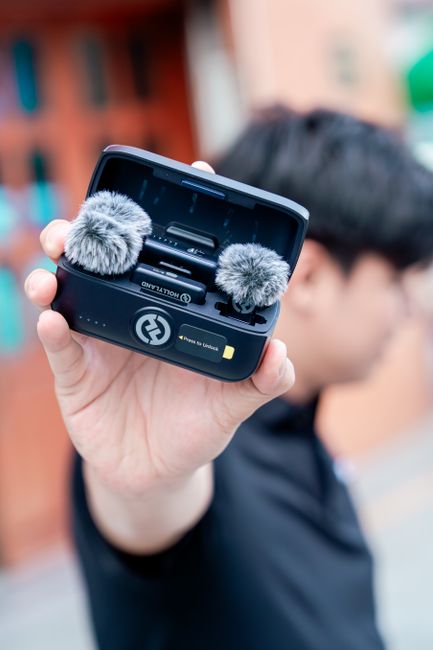
2.4GHz Systems: These are the modern darlings of the vlogging world. Brands like Rode Microphones and DJI dominated the market by making tiny, plug-and-play units operating on the same frequency as your home Wi-Fi and Bluetooth devices. They are incredibly convenient, lightweight, and usually feature built-in charging cases.
- The Pros: Insanely easy to use, lightweight, often include internal backup recording.
- The Cons: In heavy Wi-Fi congestion (like a convention center or Times Square), 2.4GHz signals can stutter, lag, or drop entirely.
UHF Systems: Ultra-High Frequency setups have been used by broadcast TV and film crews for decades. They use dedicated radio frequency blocks. Before you buy, you might even need to check regulations with the Federal Communications Commission depending on your region’s broadcast bands.
- The Pros: Rock-solid reliability over massive distances, walls aren’t a huge obstacle, zero interference from standard consumer electronics.
- The Cons: Bulky beltpacks, expensive, and require manual frequency scanning so you don’t accidentally broadcast over local police scanners.
For 90% of vloggers, a modern 2.4GHz dual-channel system is the sweet spot. Just be aware of its limitations when shooting inside a packed tech conference.
Key Features to Evaluate Before Swiping Your Credit Card
Walk into any camera store or scroll through an online retailer, and the spec sheets will start looking identical. Ignore the flashy marketing buzzwords. Here are the only four metrics that actually dictate whether your audio will sound crisp or compressed.
1. Internal Safety Track Recording
If your wireless mic only transmits audio wirelessly to your camera, you are living on the edge. Radio interference happens. Batteries die. A truck drives by with a faulty alternator and completely blanks your frequency. Look for a transmitter that features internal backup recording (often called onboard recording). It acts like a black box on an airplane—recording uncompressed WAV files directly to the transmitter’s internal memory while simultaneously sending the feed to your camera. This feature has saved my bacon more times than I care to admit.
2. Gain Staging and Limiting
Clipping is permanent. If you laugh too loud at a joke and your audio meter hits absolute zero (digital clipping), that audio is mathematically destroyed. It turns into a harsh, crackling buzz that no plugin in Premiere or DaVinci Resolve can fix. Look for systems that offer a safety track feature (recording a second track at -6dB or -12dB lower as a backup) or true 32-bit float internal recording. A built-in hardware limiter is non-negotiable if you vlog dynamic environments like street food markets or loud events.
3. Capsule Polar Pattern and Lav Compatibility
Most clip-on wireless transmitters have a tiny built-in microphone capsule. Most of the time, they are omnidirectional. This means they pick up sound from all directions. If you’re walking down a windy boardwalk, an omnidirectional mic will happily capture every gust of wind hitting your chest. Pro tip: Always use a deadcat (furry windscreen) outdoors. Better yet, look for a transmitter that has a 3.5mm microphone input jack so you can plug in a discreet, broadcast-quality lavalier mic and tuck the ugly transmitter away in your pocket.
The Verdict: Matching the Mic to Your Vlogging Style
Stop looking for the “best” microphone overall. Look for the best microphone for *your* specific workflow.
If you run and gun through quiet suburban neighborhoods and travel light, grab a compact 2.4GHz system with an integrated charging case. You’ll set it up in five seconds and never look back. If you shoot cinematic travel vlogs in chaotic megacities, invest in a system with robust encryption, heavy-duty internal backup recording, and physical gain controls right on the receiver so you aren’t forced to dig through touchscreens while walking backward down a sidewalk.
Sound design is half the cinematic experience. Treat your audio with the respect it deserves, and your audience will reward you with their retention rates.
Frequently Asked Questions
Do I really need a deadcat windscreen if I only vlog indoors?
Indoors, you probably don’t need a furry deadcat unless you are standing directly in front of an aggressive house fan or AC vent. However, you should always use a foam pop filter to tame plosives (harsh “P” and “B” sounds) that slam into the microphone capsule and distort your audio.
Why does my wireless microphone sound robotic or phasey?
This usually happens for two reasons: either you are experiencing 2.4GHz packet loss due to heavy Wi-Fi interference, or your camera’s internal auto-gain control (AGC) is aggressively fighting against your microphone’s output volume. Always turn off your camera’s auto-gain and manually set your levels low on the camera while boosting the signal cleanly from the microphone transmitter.
Can I use wireless microphones with my smartphone?
Absolutely. Most modern wireless kits come bundled with lightning and USB-C cables, or dedicated mobile receivers. Just make sure your recording app (like Blackmagic Camera or FiLMiC Pro) is actually pointed at the external USB or mic-in source rather than the phone’s built-in earpiece mic.
What is 32-bit float audio and do I need it?
32-bit float recording captures such a massive dynamic range that it is practically impossible to clip your audio or ruin a recording by speaking too quietly. While it creates massive file types and isn’t strictly necessary if you set your gain properly, it is the ultimate insurance policy for erratic, unpredictable vlogging environments.